Media Management for Easy File Handover
Hey! If you're about to send me your raw footage for color grading, I want to make sure the process is as smooth and efficient as possible. Instead of sending over huge files we don’t need, DaVinci Resolve has a great tool—Media Management—that helps us both save time and space by trimming down the raw video files.
No matter what NLE you’ve used for your edit, you can still access Resolve’s Media Management tool by downloading the free version of the software here. If you don’t have it already, this will allow you to prep your files for handover with ease!
Prep Your Project for Delivery
Before you send anything my way, the first thing you want to do is duplicate your picture-locked timeline. Keep the timeline to 1 or 2 video tracks, remove any FX, adjustment layers, LUTs, and set the timeline to the intended FPS and resolution. This will make sure the file you send is as clean and efficient as possible for grading.

Media Management (Part 1) – For Non-DaVinci Edits
If you used DaVinci for your edit, you can skip ahead to Part 2. If not, here’s what you need to do:
- Export an XML of your picture-locked timeline (not the entire project).
- Open DaVinci Resolve and go to File > Import > Timelines, then select your XML file. This should import all your media and timeline as intended.
Media Management (Part 2) – Using Resolve
Once your timeline is set up in Resolve, it’s time to use one of Resolve’s best tools: Media Management.
- Go to File > Media Management.
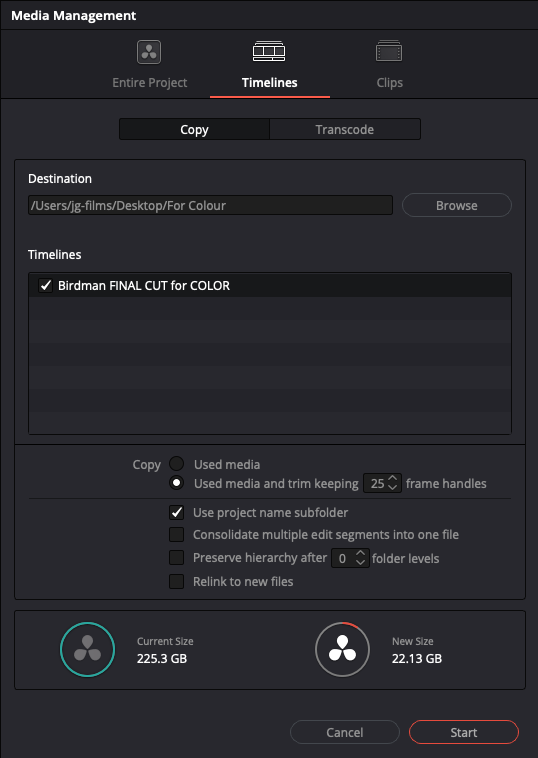
- In the window that opens, make sure Timelines is selected at the top, and Copy is selected below.

3. Choose the destination folder for your media and select the timeline you want to copy.
4. Under Copy, choose Used Media and Trim Keeping…. I usually recommend keeping 24 or 25 frame handles depending on your project’s frame rate. This gives a bit of flexibility in case adjustments are needed later.
5. You’ll see the original file size and the expected size after trimming—expect a “wow” moment when you see how much space you’re saving!

6. Hit Start to begin the process.
Additional Files Your Colourist Will Need
To help me get started with your grading, there are a few more things I’ll need:
- Low-resolution reference file: Ideally with Timecode (TC) and Source Timecode (Source TC) burned in. This ensures everything is lined up correctly.
- Reference images: If you have any visual references for the color grade, include those in the folder as well.
Send and Connect
Once everything is in place, upload the folder to your preferred cloud platform (like WeTransfer, Dropbox, etc.) and send me the link.
I’ll review everything and let you know if anything’s missing or if there are any questions about scaling, conforming, or other issues.
